
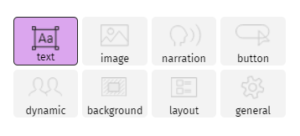
How to edit and add text
 There are many ways in which you can edit the text within your video.
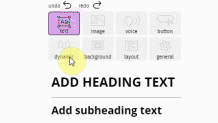
- Start off by clicking on the “text” icon and choosing a sub heading size.
- Once you’ve done, you’re on your way to adding text. You’ll notice on the right hand side, all of the different text options.
- From here you can choose anything from font type, size and even the color and opacity!
4.Additionally, here is where you’ll be able to add a link to the text should
 you want to. Just click on ” Add Link” and enter the desired address.
5. Heading down lower, you’ll find the different style and animations that you can fiddle with. Choose the one to your liking and get going!
How to add an image
Adding an image to your video is essential if you want it to shine.
- You begin by click the “image” icon on the toolbar on the right like so.
- Once you click that, you’ll have the option to upload your own, or choose from your gallery! Give it a try.
How to Upload Your Image
- Once you’ve selected the image of your liking, feel free to edit it! You can resize it using the drag points and even attach a link to it!
- Click ” Add Link” and you’re ready to go!
How to Animate
You can also choose the animation entry to your images! You’ve got a few options to choose from, and you’re on your way!
How to add narration
You need a voice! With narration, you’ll have a chance to tell your story in a whole new way!
- Click on the “narration” button on your toolbar on the right hand side
- Click the “search more” over button to get started
- In the search box, type the word or sentence that you’re looking for ( remember, by clicking on the small speaker icon, you can preview every recording!)
- Click on the recording of your choice and hit the “submit” button, you’ll see it appear on your timeline
From there, you’ll be able to freely adjust where you want your recording to appear.
Note! that you have to adjust the recording to the screen length. If it’s too long, you’ll need to lengthen the scene.
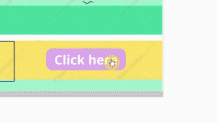
How to add an interactive button
Time to make your video interactive. One of our coolest features involves you creating a button that links the viewer to the website that you choose!
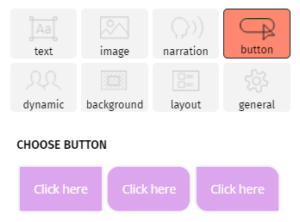
How to add a button
Heading over to the toolbar on the right side of the interface, you’ll find the “button” icon. Click that you’ll get a choice of the type of button you want to add to your video. Choose wisely!
Once you’ve chosen that, you’ll see that your button will appear on your video. You’ll have a lot of options here like you did while adding text ( How to edit text ). Don’t forget that you can place by dragging your button wherever you want on the screen! Change the color, font and much more!
STEP BY STEP
- Choose your font, color and size
- Drag your text around anywhere you want on the screen
- Choose how you want your button to look like (three designs to choose from)
- Add a link to your button
How to add a link
Within the field link section, you’ll find an area where you can put in any address that you would like your interactive button to link to. Easy peasy!
Note: Your buttons will only work where an iframe is applicable.
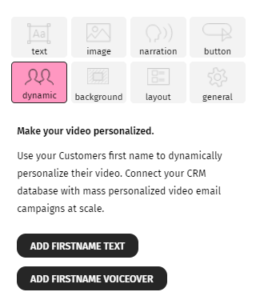
How to make your videos dynamic
Set yourself apart from the rest. We provide the tools to personalize your videos! Here’s how.
- Press the “dynamic” tab on your right hand side menu.
- You’ll be met with two options. Should you want to insert a personalized text, hit the “Add firstname text” button
- If you want to add a personalized voice over, hit the “Add firstname voiceover” button
- Whatever you choose, you’ll see that it’ll automatically appear on your video. Feel free to place it where you choose using the editor time line.
How to change or crop your video
We give you total freedom over your videos! Here’s how you can change the videos or crop to your liking.
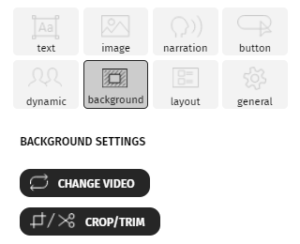
- Click on the background button on your right side toolbar
- To change the video, click the “change video” button and you’ll be met with a video you’ve already been familiarized with here ( How to add a new scene)
- You can also trip and crop your videos once more. This time click on the “Crop/Trim” button and your video will open once again.
- Drag the sliders to the appropriate time frame and you’re good to go, hit “Apply“!
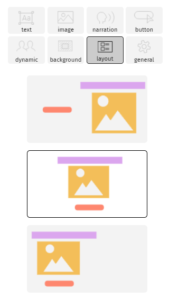
How to change the layout
To make things easier for you, you can choose from premade layouts for your video!
- Click on the “layout” button on your right hand side menu
- From there, you’ll have 3 layouts to choose from, choose whichever layout you need.
- Ready? Hit “Add Layout” , you’ll see that the layout has now been properly placed on your video and timeline!
This will save you time and get things rolling! A cool thing to remember is that your choices will always be saved, in the event that you would like to switch between layouts.
How to add music
Let’s put some life into your video! Music’s here to save the day!
Adding music into your video is simple. Head on over to your main toolbar on the right side, and click on the ” general ” tab. From there you’ll see the “Music” section, simply click “Add“. Here you’ll be met with an incredible selection of tracks to choose from! Hitting the small speaker icon next to every track gives you a chance to preview the music. Hit the “submit” button and you’re ready to go!
Note: Please remember that when you add music, it’s added to the entirety of your video. You cannot choose different music for individual scenes.

Neat! Don’t forget that you can also adjust the volume of your music by hitting the appropriate arrows. And that’s all, you’re set!
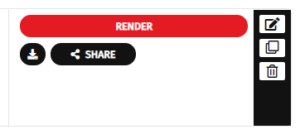
How to render a video
You want to export your video? No problem!
- Go to your “My movies” section, here you’ll see a list of all of your videos.
- On the right side, you’ll see a window dedicated to numerous things, including the ability to render your video. Hit the big red “Render” button.
- You’ll be prompted with a new window and the ability to choose how you want your movie to be exported.
- Choose the resolution , quality. Once you’re ready, hit “Submit“
- Your video will now be exported in .mp4 format!
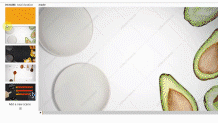
How to add a new scene
You’ll need a video to get you started. Here’s how we do that!
- At the left hand side, you’ll see the ” Add a new scene ” section, click the “+” to get started.
- From here, you can either upload your own movie (up to 60mb) by clicking on the red icon
- Or choose from one of our templates, there’s plenty to choose from!
- Choose the length of the clip by dragging the sliders from each end to your liking.
- Hit the red ” Apply” button and you’re ready to go!
Additionally, you can rearrange your scenes in any way you want. Just drag them in the appropriate order!
How to share your videos
You want your videos out in the world right? Start sharing your videos immediately!
While you’re exploring your “My movies” section, glance on over to the right side menu that you’ve already familiarized yourself with.
- Click on the “share” button
- You’ll be met with a new window inviting you to share your videos in all sorts of ways
- If you simply want to share the link, in the “Download & Share” section, hit “copy link ” and paste it to whoever you want to share it with
- If you’re looking to embed onto a landing page,blog etc just copy the iframe code and paste it.
- Applying to your facebook messenger or other apps? Choose from the drop down menu and then once again hit the ” copy link ” button to gather the appropriate code.
- Mailchimp, Hubspot user? Use the “Attract via Personalized video emailing” section. Copy the link and you’re good to go!
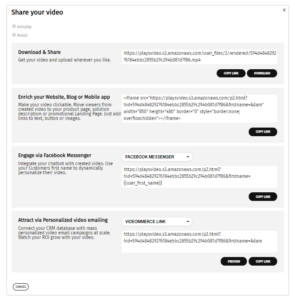
At the top of the window you’ll see two things you can tick on or off. “Autoplay” and “Muted“. Depending on what you choose, this will apply the desired effect on your embedded and personalized videos when you copy the link of your choosing.
How to view your movies
You’ve got a nice collection of videos now and you want to view them for your own pleasure? Let’s go!
- Head on over to your “my movies” section , you’ll find it on the left side menu.
- Once you’re there, you’ll see a complete list of all of the videos that you’ve made.
- Click on the upper-left eye icon to view your video
You can also preview your movies while you’re in editor mode by clicking the “Preview” button at the top of your screen!
![]()
How to edit your account
Need to change your account information? Sure! Here’s how.
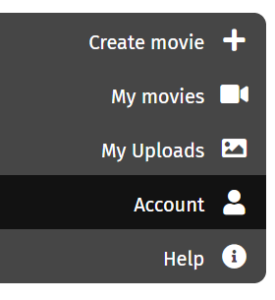
- Click on the “Account” tab on the left side menu
- From here you’ll be met with all of your information including email and address, you can edit it here!
- Switching over the “Payments” tab lets see you what plan you’re currently on and a history of your payments.
- As soon as you’re done with everything, just hit ” save ” at the bottom.
Take note that this is also the place where you can add your company logo.
How to manage your uploads
We give you the ability to upload your content, and chances have it you probably want to see what you’ve uploaded thus far. Here’s how!
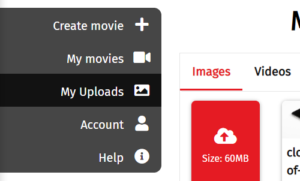
- Click on “My Uploads” on the left side menu
- From there you’ll be taken to a page containing all of the content you’ve uploaded thus far. You can switch between the two tabs freely , “Images” and “Videos”
- You can also upload new content as well, just click the cloud logo.
- Feel free to delete any content you want using the red “X” next to your image or video.
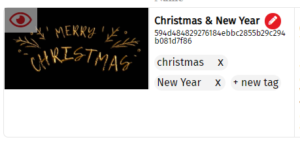
How to pick your video format
We make it easy for you to choose the right format, for the right channel!
When starting a new video ( using the ” Create New Movie ” button at the top ) you’ll be met with a screen. Here you can create the title of your movie, the theme you’d like to put it in and the format you’d like to choose.
- Choose which format you will need, depending on which tab you choose ( Social Media, Programmatic Video, Dynamic) you’ll get various sizes
- From there, click on the format of your choosing.
- If you would like, you can add a tag name to your video , click ” Add tag“
- Once you’ve decided on everything, click “Create movie” and you’re ready to go!
How to crop to your format
If you decide to choose anything other than 16:9, you’ll have a chance to choose exactly which area of a scene you’d like to use.
As soon as you add a new scene ( How to add a new scene) , using your mouse and dragging the field of view to your liking.
- Use the circular icon to position the scene to fit your format
- You can also make adjustments to the length of the scene using the sliders near the timeline. Drag each end to your liking.
- As soon as you’re done, hit ” Apply ” !
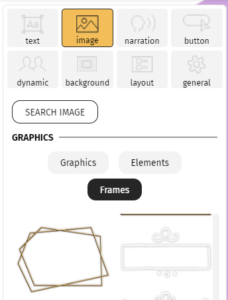
How to add frames and other graphics
Wrap your text in our beautiful frames or add expressive graphics to your videos!
- Head on over to the “image” icon. Click it and a sub menu will appear underneath.
- Choose “Frames“, “Graphics“, or “Elements” depending on what you want to use.
- Once you’ve chosen, another menu will appear with the corresponding graphics, choose the one that you would like to add by clicking on it
- Click “Add graphic” at the bottom and your content will appear on your video. Feel free to move it around anywhere you like!
How to capture and upload your own video
Would you like to record your own video and make it interactive and far more engaging? We can help!
- On the left hand side menu, click on ” My Uploads“
- Choose the “Videos” tab
- Click the red upload tab to get started
- Choose “Record“. Your computer will ask you for permission to use your webcam, make sure it’s properly installed!
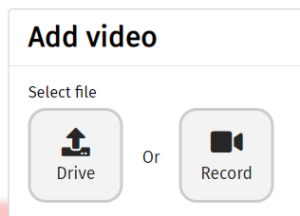
- Hit the “Record” button and you’re good to go!
- Once you’re done recording ( you have up to 1 minute), hit the submit button and wait for it to render.
- You can now use your captured video! Add text, music, narration and anything else you want to satisfy your needs!
Have fun!